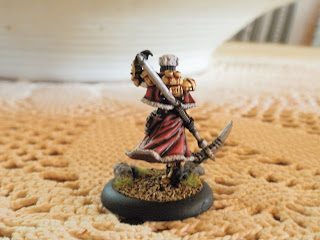
The following is a "walkthrough" for painting up my newly received figure pSorscha for the game Warmachine by Privateer Press.
Step 1: Receiving the figure(s)
I bought a Khador Battlegroup from a friend currently living in the UK. When it arrived it needed some repairs and assemply.

Here I have pinned the figures. The painting at this stage is how I received them. Bases are at an early stage here. A few small stones have beed glued to the bases, and the greenstuff on the "Jacks" is part of a "tall grass" experiment.
Step 2: Assemply Notes
The head of the hammer had broken off and the back piece was missing. The back piece was easily solved by cutting and adding a piece of an old spear I had lying around.

The hammer piece is too small to be pinned, so I had to "2-point glue it" between her hand and the rock on the base.
Besides that sand was added to the base, by painting white glue all over and dumping the figure in fine sand.
Step 3: Undercoat
Black undercoat, not really a lot to see here:o)

I always undercoat black, and always glue my figures together and making the bases before I paint.
The only real reason for this is to avoid painting a lot of little pieces, and then have to be careful not to mess up the painting when trying to glue the figure together in the end.
Step 4: First real painting step.

Base colours are as follows:
Armour: Brazen Brass
Robe: Scab Red
Skin: Dwarf Flesh
Weapon: Boltgun Metal
Pants, edge of robe, inner shirt, hat: Fortress Grey
Choose a limited palette (about 3 colours). Thats even more important when doing a whole army that needs to look as a unit, and not some rag tag band. In my example here I will end with gold, red and white. I don't count metal and skin in the "3-colour palette".
Make sure you cover the undercoat. Its not THAT important if you use black undercoat, but very important if you use white undercoat. A figure undercoated with white looks unfinished if you aren't careful and cover the undercoat completely. I always undercoat black, since its very forgiving.
Step 5: Inks
Its a short step, but an important one.
Here I have used:
Skin, armour: Flesh Wash
Robe, weapon: Black ink
Inks are easy to use, give instant effect and best of all, you don't have to be careful;o)
Step 6: Redefining Colours
At this point I do another layer of the base colours. I suppose you could apply the inks so careful that you could skip this step, but I don't really make that a priority.
I am trying to accomplish a very bright and clean gold, so instead og giving the figure another layer of Brazen Brass, I go straight for Burnished Gold.
Step 7: Highlights
Time to build up some highlights. I usually go for 2+ layers of highlights. On the other hand I am not the type to make a lot of layers. I am not trying to win contests, I am trying to find a balance between getting good results in the shortest amount of time.
The colours:
Armour highlight: Burnished Gold mixed with Mithril Silver
Robe: Scab Red mixed with Bleached Bone
Skin: Elf Flesh
Base: I start working on the base here. A coat of Bestial Brown for the sand, and Adeptus Battlegrey for the stones.
Step 8: Final High Lights
Repeating Step 7 but with brighter colours, but I guess its hard to see on the pictures;o)
The base have got a drybrush with Bubonic Brown. Stones get a highlight with Adeptus Battlegrey mixed with Skull White.
Final result:
Finishing the base. Last drybrush with Bleached Bone and then adding some Static Grass for final touches.


And there she is, all ready for gaming:o)
That's all for now
BS


Ingen kommentarer:
Send en kommentar